
Trees
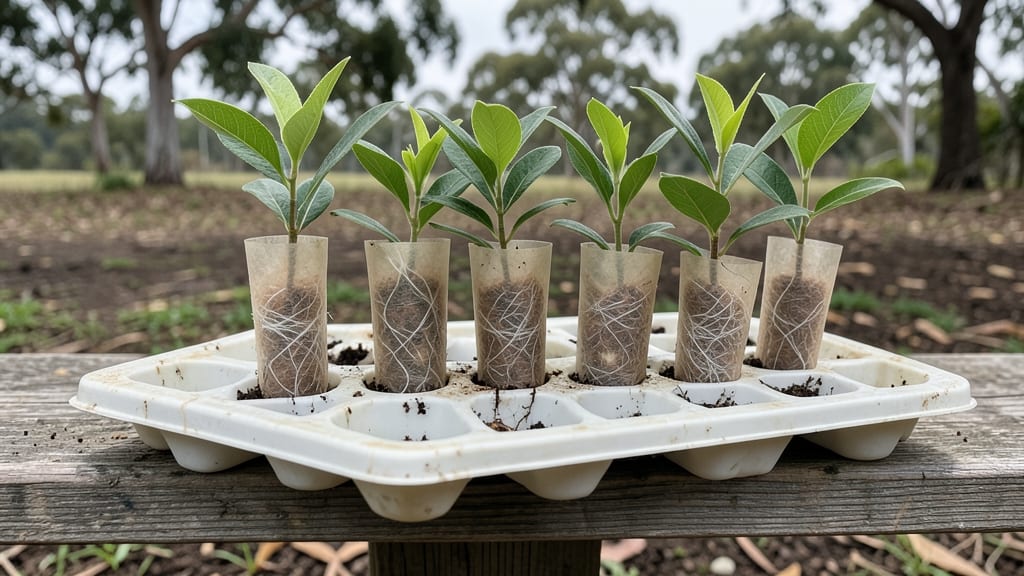
Planting trees in tubes gives you a head start on a thriving landscape—no nursery shock or waiting for roots to establish. I’ve transplanted dozens of these container-grown trees, and the key is handling that root ball carefully while giving roots room to spread.
The right soil prep and watering routine make all the difference between a struggling sapling and a sturdy, fast-growing tree.
You’ll need basic tools: gloves, a shovel, mulch, and a watering can. The process takes about 30 minutes, but the long-term payoff—faster growth, fewer transplant stresses, and healthier roots—is worth it. Even in small yards, these trees adapt well to their new home with proper care.
After planting, expect bright green leaves within weeks and steady growth by the first season. The secret is keeping soil moist but not soggy and avoiding heavy traffic near the base. With the right approach, your trees will outperform bare-root transplants every time.
Works for shade trees, fruit trees, and ornamental varieties alike. Whether you’re filling a backyard or a city lot, this method ensures strong starts. Let’s get those roots settled in the right way.
📚 In This Guide
- What you need
- Instructions
- Tips and common mistakes
- Wrapping up and next steps
What you need
- ● Grow tubes (10–20 units): Biodegradable or reusable, 6–12 inches tall (standard sizes work best for small trees).
- ● Ensure they have drainage holes at the bottom.
- ● Potting soil (1–2 bags): Use a well-draining, peat-free mix (e.g., cactus/succulent blend or seed-starting soil).
- ○ Optional: Add perlite or vermiculite (1 part per 4 parts soil) for extra aeration.
- ● Seedlings or small trees (10–20 units): Choose slow-growing, compact varieties like bonsai-friendly trees (e.g., ficus, jade, or dwarf citrus).
- ● Avoid root-bound plants—opt for 2–4 inch tall seedlings.
- ● Watering can or spray bottle: Small nozzle for gentle watering (avoid over-saturating the soil).
- ● Scissors or pruning shears (for trimming tubes if needed).
- ● Tray or saucer (to catch excess water and prevent messes).
- ○ Fertilizer (optional): Use a balanced liquid fertilizer (e.g., 10-10-10) diluted to half-strength every 4–6 weeks.
- ● Grow lights or sunny windowsill: If natural light is limited, a LED grow light (6–12 inches above plants) works wonders.
- ● Labels & markers (to track plant types and watering schedules).
- ● 🌡️ Temperature matters: Keep tubes in a spot with 65–75°F for optimal growth.
- ● ✨ Rotate tubes weekly to ensure even light exposure (prevents lopsided growth!).
- ● 💧 Water only when the top inch of soil feels dry—overwatering is the #1 killer of tube-grown trees!
Step-by-Step guide to growing trees in tubes indoors
Here's how to nurture sturdy, healthy trees using the tube method—perfect for beginners.
🪴 Step 1: Select and Prepare the Tubes
Choose 4-inch diameter tubes made from biodegradable material like cardboard or recycled paper. These should be at least 18 inches tall to accommodate root development. Cut the tubes into 12-inch sections—this gives enough room for the root ball while keeping the plant manageable for indoor growing.
Fill each tube with 2 inches of well-draining potting mix, leaving space at the top for the tree's root ball. Press the soil lightly to remove air pockets but avoid compacting it. The goal is a loose, aerated medium that encourages strong root growth. If your mix is too dense, add perlite or vermiculite to improve drainage.
🌱 Step 2: Plant the Tree Seedlings
Gently remove a young tree seedling from its nursery pot, taking care not to disturb the root ball. Place the seedling into the tube so the top of the root ball sits 1 inch below the tube's rim. This ensures stability while allowing room for watering without spilling.
Fill the remaining space in the tube with additional potting mix, pressing lightly around the base of the tree. Water thoroughly until moisture drains from the bottom of the tube, signaling the soil is evenly saturated. Avoid overwatering—soggy soil can suffocate roots and lead to rot.
☀️ Step 3: Provide Optimal Light and Care
Position the tubes near a south- or west-facing window where they’ll receive at least 6 hours of indirect sunlight daily. If natural light is insufficient, supplement with a grow light placed 12 inches above the tubes for 12-14 hours per day. Trees in tubes need consistent light to develop strong stems and foliage.
Water the trees once a week, checking that the top 1 inch of soil feels dry before adding more moisture. Overwatering is a common mistake—yellowing leaves or wilting can signal either too much or too little water. Rotate the tubes quarter-turn weekly to ensure even growth toward the light.
⏰ Step 4: Monitor Growth and Transplant When Ready
After 4-6 weeks, the tree’s roots will begin to fill the tube, and new growth will appear. This is your cue to assess whether the tree is ready for transplanting. If the roots are tightly wrapped around the tube or emerging from the bottom, it’s time to move it to a larger container or outdoor planting site.
To transplant, carefully slit the tube along its length and gently remove the root ball. Place the tree in its new home, ensuring the top of the root ball remains at the same level as before. Water deeply to help the roots settle into their new environment. This method minimizes root disturbance, giving your tree the best chance to thrive.
Tips & tricks for perfect trees in tubes
Here's what nobody tells you about making this method work flawlessly for beginners.
Tube Selection Wisdom: While the instructions specify 4-inch diameter tubes, I've found that slightly larger tubes (4.5 inches) provide extra stability for windier conditions. For outdoor use, opt for tubes with built-in drainage holes—this prevents waterlogging while maintaining the tube's structural integrity. If you can't find pre-drilled tubes, use a nail to carefully puncture holes at the bottom before planting.
Root Ball Placement Technique: The 1-inch depth guideline in Step 2 is critical, but here's the trick: press the soil around the root ball with your fingers to eliminate any air gaps. This ensures immediate root contact with the soil. For delicate seedlings, consider using a small trowel to gently firm the soil without disturbing the roots.
Light Optimization Strategy: The 6 hours of indirect sunlight is a minimum, but I've seen dramatic improvements when supplementing with a grow light during the 12-14 hour window. Position the grow light so it casts light on the tubes from all sides—this mimics natural sunlight patterns. For best results, use a full-spectrum LED grow light that covers the blue and red light spectrums essential for plant growth.
Transplanting Readiness Check: After those 4-6 weeks, don't rely solely on root visibility. Gently tap the tube on a hard surface—if the tree wobbles noticeably, it's not ready. For a more precise test, carefully slit the tube open and check for roots that have filled at least 75% of the tube's volume. This ensures your tree has developed enough root structure to handle transplanting without shock.
Pro Tips for Trees In Tubes
- Here's what nobody tells you about making this method work flawlessly for beginners.
- Tube Selection Wisdom: While the instructions specify 4-inch diameter tubes, I've found that slightly larger tubes (4.5 inches) provide extra stability for windier conditions.
- Root Ball Placement Technique: The 1-inch depth guideline in Step 2 is critical, but here's the trick: press the soil around the root ball with your fingers to eliminate any air gaps.
Frequently asked questions
Got questions about growing trees in tubes? We’ve got answers!
Whether you’re curious about setup, care, or troubleshooting, this FAQ covers the basics to help you succeed—no green thumb required.
What are trees in tubes, and how do they work?
Trees in tubes are a soilless growing method where young trees (like citrus, avocado, or olive) are planted in fabric or mesh tubes filled with a lightweight medium (like coconut coir or vermiculite). The tubes allow roots to grow freely while keeping the medium moist and aerated. It’s perfect for small spaces or beginners!
How long does it take for a tree in a tube to grow?
Growth speed varies by tree type, but most trees in tubes show noticeable progress in 4–8 weeks. Citrus trees might bear fruit in 1–2 years, while avocado trees take 3–5 years. Patience is key—consistent care (light, water, and nutrients) speeds up the process!
How often should I water trees in tubes?
Water when the top 1–2 inches of the growing medium feel dry (usually every 2–3 days for young trees). Overwatering is risky—tubes drain poorly if roots get waterlogged. Use a spray bottle for gentle hydration or a moisture meter to check levels. Pro tip: Tubes dry faster in bright light!
Can I reuse or repurpose the tubes after transplanting?
Yes! Clean the tubes with soapy water and bleach (1:10 ratio) to kill bacteria, then rinse thoroughly. Reuse them for new seedlings or compost the old medium. Warning: Avoid reusing tubes with signs of mold or pest damage—start fresh for safety.
What should I do if my tree’s leaves turn yellow or wilt?
Yellow leaves often signal overwatering or nutrient deficiency. Check the roots—if they’re mushy, reduce watering. Wilting could mean underwatering or root stress. Try these fixes:
- Adjust watering frequency (let the top layer dry slightly).
- Fertilize with a balanced liquid fertilizer (like 10-10-10) every 4–6 weeks.
- Ensure the tube gets 4–6 hours of indirect sunlight daily.
Are there alternatives to fabric tubes for soilless growing?
Try these beginner-friendly options:
Method
Pros
Cons
Hydroponic buckets
Faster growth, reusable
Requires more setup (pumps, nutrients)
Coco coir bricks
Lightweight, retains moisture
Breaks down quickly (replace every 6–12 months)
Air pruning pots
Encourages stronger roots, durable
More expensive upfront
Tubes are the most budget-friendly and low-maintenance choice for starters!
Wrapping up and next steps
Growing trees in tubes isn’t just a clever space-saving hack—it’s a rewarding way to bring nature indoors while keeping your green thumb thriving! 🌱 Whether you’re a first-time gardener or a seasoned plant parent, this method proves that success starts with the right setup and a little patience.
Now that you’ve got the answers to common questions and a clear list of supplies, it’s time to roll up your sleeves and get planting.
Ready to watch your tiny tree grow? Start by gathering your materials, follow the steps, and don’t forget to celebrate those early milestones! Your future indoor forest awaits—one tube at a time. 🌿