
Pruning
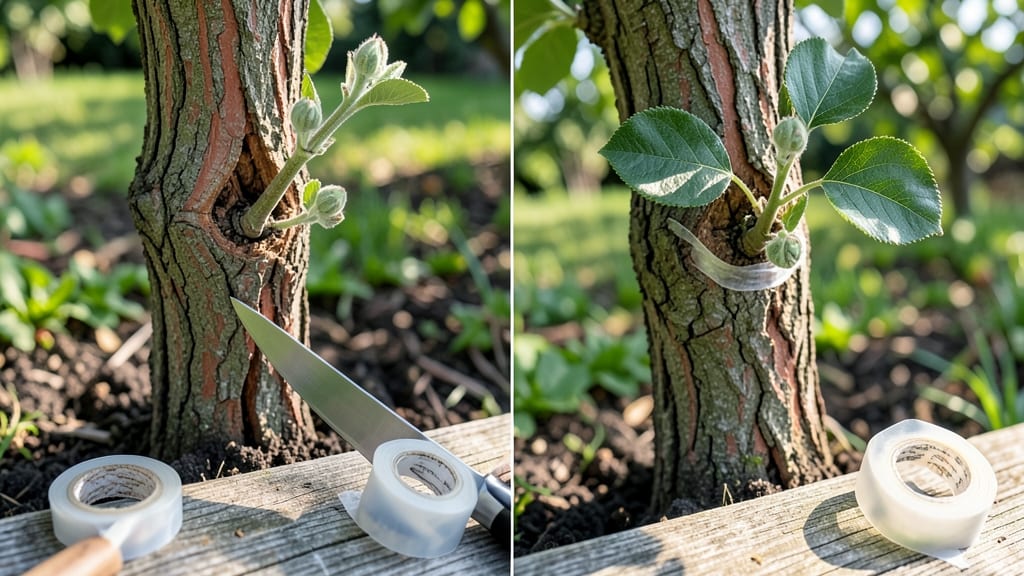
See the stunning transformation in tree grafting before and after—that spindly branch you saved now bursts with fruit, proving a little patience grows miracles. 🌳 I remember my first grafted apple tree: what started as a weak, spindly limb now produces bushels of crisp fruit every fall, and I’ll show you exactly how to replicate that transformation.
The secret lies in timing, precision, and the right tools—whip-and-tongue grafts for smooth bark, cleft grafts for thicker trunks. You’ll need sharp grafting knives, grafting tape, and a clear day when the tree’s sap is flowing.
Most fruit trees (apples, peaches, plums) and even roses respond beautifully, but compatibility matters—grafting an apple scion onto a peach rootstock won’t work.
By summer’s end, you’ll see new growth where the graft joined, and within a year, that once-bare branch will burst with blossoms and fruit. The satisfaction of watching a tree you’ve essentially "upgraded" is unmatched—imagine plucking your own homegrown peaches instead of watching neighbors’ trees flourish while yours stays barren.
Works for backyard orchards, container-grown fruit trees, or even reviving old roses. Let’s get those scions aligned and those trees thriving!
📚 In This Guide
- What you need
- Instructions
- Tips and common mistakes
- Wrapping up and next steps
What you need
- ● Grafting scissors or a sharp grafting knife – Look for precision blades (e.g., Felco #2 or #3) to make clean cuts.
- ● Grafting tape or rubber bands – 1-2 rolls, ½-inch wide, to secure grafts tightly.
- ○ Pruning sealant (optional but recommended) – Wound dressing like Tanglefoot Tree Wound Pruning Seal to prevent disease.
- ● Rootstock and scionwood – Healthy, disease-free cuttings (rootstock from your tree, scion from a desired fruit variety).
- ● Ruler or measuring tape – For precise cuts (¼–½ inch is ideal).
- ● Disinfectant (rubbing alcohol or bleach solution) – To sterilize tools and prevent contamination.
- ● Sharpie or wax pencil – For labeling grafts if working with multiple varieties.
- ● ✅ Timing: Graft in late winter or early spring (dormant season for best success).
- ● ✅ Weather: Choose a cloudy day (50–60°F) to reduce stress on the tree.
- ● ✅ Tree health: Ensure the rootstock is vigorously growing and free of pests/diseases.
- ● ✅ Safety gear: Gloves and long sleeves to protect from thorns and sap.
- ● 🔥 Test your tools: Sharpen blades before cutting to avoid crushing bark.
- ○ 🌡️ Humidity control: Keep grafts moist but not soggy with a plastic bag (optional) until healing.
- ● ✨ Practice first: Try grafting on smaller branches before tackling your main tree.
Step-by-Step guide to successful tree grafting
Here’s how to turn underperforming trees into strong, productive growers.
🌱 Step 1: Select and Prepare Your Scion and Rootstock
Choose a healthy scion—this is the branch carrying the fruit-producing genes—from a tree you admire. It should be about as thick as a pencil and free of disease. The rootstock is your existing tree’s trunk or a compatible root system; prune it back to a smooth, clean surface at the grafting height, usually around 4-6 feet off the ground. Use a sharp knife to make a clean cut—no jagged edges.
Here’s the thing—timing matters. Perform this step when both scion and rootstock are dormant, typically in late winter or early spring. You’ll know you’re ready when buds on both are swollen but haven’t yet burst open. If you graft too early, the scion may dry out; too late, and the tree’s sap flow will reject it.
✂️ Step 2: Make Precision Cuts for Perfect Alignment
For a whip-and-tongue graft, cut the scion at a 45-degree angle about 2-3 inches long. Do the same to the rootstock, creating matching sloping surfaces. Slide the cut ends together so the cambium layers—the green tissue just under the bark—align perfectly. This is the moment that matters: if the cambium doesn’t meet, the graft will fail.
Secure the joint immediately with grafting tape or rubber bands, wrapping snugly but not too tight. You’ll see sap oozing at the cut—this is normal and signals the tree’s system is active. Cover the entire graft with grafting wax to seal it and prevent drying. If you skip the wax, your graft could desiccate within hours.
💧 Step 3: Protect and Monitor the Graft
Keep the grafted area shaded and moist for the first 4-6 weeks. Water deeply but gently around the base, avoiding direct spray on the graft itself. You’ll notice new growth emerging from the scion in 6-8 weeks—this is your signal that the graft took. If the scion withers or turns brown, it’s likely failed; don’t panic, just try again with fresh material.
Real talk: Grafting isn’t always perfect on the first try. If the scion doesn’t bond, cut it off and try a new one. Patience is key—some grafts take up to 3 months to fully integrate. Once the scion is established, remove any competing shoots from the rootstock to direct the tree’s energy into growing your new variety.
☀️ Step 4: Transition to Full Care After Success
Once the grafted scion shows 3-4 inches of new growth, it’s time to transition to normal care. Gradually expose it to full sun over 2 weeks, moving it from shade to partial sun before placing it in direct light. Prune any suckers or water sprouts that emerge from the rootstock—these drain energy from your new fruit-bearing branch.
You’ll see the first signs of fruit production in 1-2 years, depending on the tree type. Apples and pears often take longer, while stone fruits like peaches may reward you sooner. Keep an eye out for pests or disease near the graft—these trees can be more vulnerable in their first season.
Tips & tricks for perfect tree grafting
Transforming a weak tree into a fruit-bearing powerhouse takes precision—and these pro tips will help you avoid common pitfalls.
Scion Selection Matters: When choosing your scion in Step 1, look for branches that are pencil-thick and have vibrant green leaves. The health of your scion directly impacts the success of your graft. I learned this the hard way after using a slightly yellowed branch that failed to take. Also, collect scions early in the morning when they’re fully hydrated, which improves their chances of survival during the grafting process.
Precision Cuts Are Non-Negotiable: In Step 2, those 45-degree angles aren’t just for looks—they create maximum surface area for the cambium layers to align. Use a sharp grafting knife and make each cut with one smooth motion. I’ve found that practicing on scrap wood first helps perfect the angle. Remember, the cambium must meet perfectly for the graft to succeed—this is where most failures happen.
Graft Wax Application: Don’t skip this critical step after securing your graft. The grafting wax creates a protective seal that prevents moisture loss. Apply it generously over the entire grafted area, including the tape or rubber bands. I’ve seen grafts fail within hours when this step was overlooked. The wax also helps maintain humidity around the graft, which is crucial during those first critical weeks.
Monitoring Growth: When you see new growth emerging in 6-8 weeks (Step 3), that’s your green light. But watch closely—if the new shoots appear weak or yellow, it might indicate poor cambium alignment. In my experience, successful grafts show firm, upright growth within 2-3 weeks of that initial emergence. Keep an eye out for any signs of stress, and be prepared to try again if needed.
Pro Tips for Tree Grafting Before And After
- Transforming a weak tree into a fruit-bearing powerhouse takes precision—and these pro tips will help you avoid common pitfalls.
- Scion Selection Matters: When choosing your scion in Step 1, look for branches that are pencil-thick and have vibrant green leaves.
- Precision Cuts Are Non-Negotiable: In Step 2, those 45-degree angles aren’t just for looks—they create maximum surface area for the cambium layers to align.
Frequently asked questions
Got questions about tree grafting? You’re not alone! Here are some of the most common concerns—plus clear, actionable answers to help you succeed.
When is the best time to graft a tree?
The ideal window is late winter to early spring (dormant season), when trees are still inactive but sap starts flowing. This timing minimizes stress and boosts success rates. Avoid grafting during extreme heat, frost, or active growth periods—your scion (the grafted part) needs energy to bond!
Can I graft any two tree types together?
Nope! Compatibility is key. For example, apple scions thrive on rootstocks like Malling 9 or Antonovka, but grafting an apple onto a peach rootstock? That’s a recipe for failure. Always check genetic compatibility—local nurseries or extension offices can guide you.
What if my graft fails? How do I troubleshoot?
Don’t panic! Common issues include:
- Poor healing: Check for loose tape/wrap or dried-out cambium layers. Re-graft if needed.
- Fungal growth: Sterilize tools with rubbing alcohol and use fungicide on cuts.
- No new growth: Ensure the graft is in full sun and water deeply (but avoid soggy soil).
Do I need to prune my tree before grafting?
Yes! Prune back the rootstock to 12–18 inches above the graft site to redirect energy toward healing. Remove any competing branches or suckers that could drain resources. Think of it like giving your tree a fresh start—less clutter = better focus on recovery.
Is grafting cheaper than buying a new tree?
Long-term, yes! A grafted tree retains its rootstock’s hardiness (disease resistance, drought tolerance) while producing your chosen fruit variety. Upfront costs for tools/scions may seem high, but it’s a one-time investment. Plus, you’ll save on future tree purchases—win-win!
Wrapping up and next steps
Tree grafting is a game-changer for transforming underperforming trees into thriving fruit-bearing powerhouses! 🌱 By understanding the before-and-after process—from selecting the right tools to mastering techniques like whip-and-tongue or cleft grafting—you’re equipped to breathe new life into your garden. The key is patience, precision, and a little creativity.
Ready to take the next step? Start small—practice on a few branches or even a nursery sapling before tackling mature trees. And don’t forget: every expert was once a beginner. Grab your grafting tools, roll up your sleeves, and watch your trees flourish! 🌳✨