
Pruning
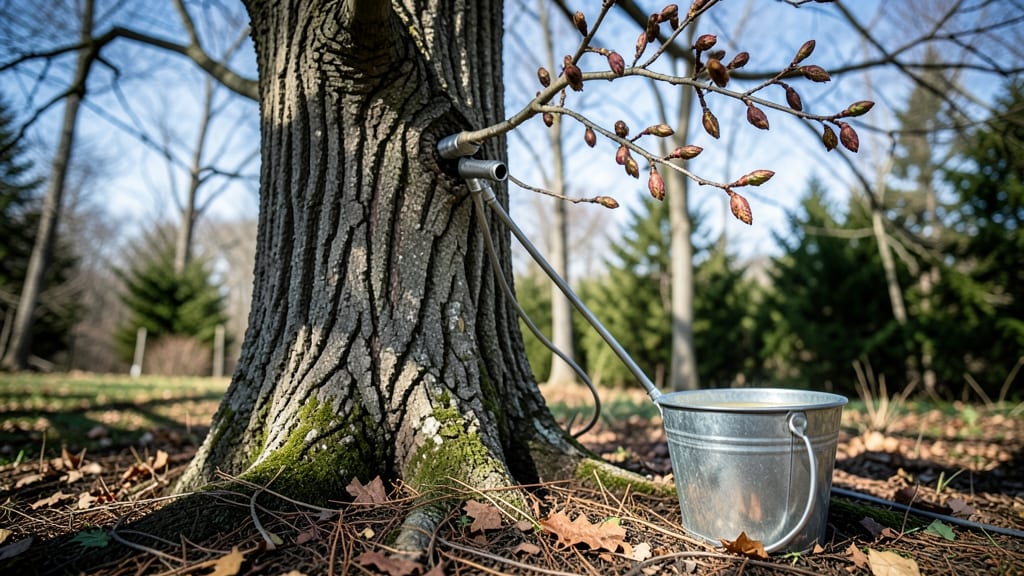
Your first batch of homemade maple tree taps starts with the right timing—late winter when temperatures swing between freezing nights and sunny days. I remember the first time I tapped a tree in my backyard, watching sap drip like golden syrup from the bark.
The secret isn’t just the taps, but knowing when to install them: sap flows best when daytime temps hit 40°F or warmer after nights below freezing.
You’ll need just a few supplies: a 1/4-inch drill bit, wooden spiles (or even clean wooden skewers), a bucket or tubing system, and a mallet. The process is simpler than it looks—no fancy equipment, just sharp tools and patience.
I started with a single tree and now have three, each yielding enough sap for small batches of syrup. The key is choosing healthy trees at least 10 inches in diameter with smooth bark, avoiding any with signs of disease or damage.
Once installed, you’ll see sap dripping within days—clear, sweet, and full of potential. A single tree can produce 10-20 gallons of sap, which reduces to about 1 gallon of syrup. The first pour is always the most exciting, like unlocking a secret from the forest floor.
With the right care, your taps will keep producing for years, turning winter’s quiet into a harvest of golden rewards.
This method works for backyard enthusiasts or small-scale producers alike. Whether you’re tapping a single tree in your yard or planning a grove, the principles stay the same. Here’s how to get started without the guesswork—no syrup store in sight, just pure, homemade sweetness from your own trees.
📚 In This Guide
- What you need
- Instructions
- Tips and common mistakes
- Wrapping up and next steps
What you need
- ● Maple tree: A healthy sugar maple (Acer saccharum), black maple (Acer nigrum), or red maple (Acer rubrum)—at least 40 inches in diameter (smaller trees may yield less sap).
- ● Drill: A 5/16-inch wood bit (for tapping) or a 7/16-inch spile (for larger trees). A cordless drill with battery power is ideal for ease.
- ● Spiles (taps): 1-2 stainless steel or plastic spiles per tree (avoid aluminum—it corrodes). Size should match your bit (e.g., 5/16-inch for standard taps).
- ● Buckets or collection containers: 1-2 food-grade 1-2 gallon buckets per tap (hang them with a strong cord or wire to avoid spills).
- ○ Sap collection bags (optional but helpful): 5-gallon bags with spout (reduce handling and evaporation).
- ● Food-grade tubing: 1/2-inch diameter tubing (if using bags; connect to spiles with a tubing adapter).
- ○ Sap filter (optional): A fine mesh screen or cheesecloth to strain out bark and debris.
- ● Marking tools: Permanent marker or tape to label trees and track sap flow.
- ● Safety gear: Gloves, eye protection, and sturdy footwear (sap can be messy, and branches are slippery!).
- ● Sap thermometer: Monitor sap temperature (ideal range: 40–50°F) for peak flow.
- ● Refrigerator or cold storage: Slow sap evaporation by storing buckets in a cool, dark place.
- ● Sap evaporator (for boiling): A large stainless steel pot or dedicated sap boiler (if you plan to process sap on-site).
- ● Tree wound sealant: Bee’s wax or tree sealant to protect the tap hole after collection (promotes faster healing).
- ● Portable scale: Weigh sap buckets to track yield (1 gallon of sap ≈ 1 quart of syrup).
Step-by-step instructions for installing homemade maple tree taps
Here’s how to craft your own taps—no special tools required, just sharp focus.
🪴 Step 1: Choose the Right Tree and Drill Holes
Select a healthy sugar maple (Acer saccharum) at least 12 inches in diameter—thinner trees won’t produce enough sap. Use a 1-inch spade bit (or clean, sterilized drill bit) to bore holes 1.5–2 inches deep at a slight upward angle. This prevents sap from pooling at the base and encourages steady flow.
Drill two holes per tap, spaced 1–2 inches apart vertically. The lower hole should be 2–3 inches above the ground—this keeps the tap above potential frost heaves. Wipe away any sawdust with a damp cloth to avoid clogging the tap later. I always mark the holes with a pencil first to ensure perfect alignment.
☀️ Step 2: Insert and Secure the Tap
Slide the homemade tap (a 12-inch wooden or plastic spout) into the upper hole first, then the lower hole. The tap should sit snug but not tight—if it’s too loose, sap will leak around it; if too tight, you’ll crack the wood. Use a mallet and rubber mallet pad to tap the tap gently into place until it’s flush with the bark.
Seal the gaps between the tap and bark with beeswax or paraffin wax (melted and applied with a paintbrush). This prevents sap from dripping down the tree trunk, which can attract pests or cause rot. A well-sealed tap will last 3–5 years with minimal maintenance. I like to test the seal by running a finger along the edges—if it feels smooth and cool, you’re good to go.
💧 Step 3: Connect to Collection Tubing
Attach food-grade silicone tubing (or 1/4-inch PVC tubing) to the tap’s spout, securing it with zip ties or hose clamps. The tubing should slope gently downward to prevent air pockets from blocking flow. Run the tubing to a 5-gallon bucket placed on a sturdy stand—this keeps it stable in wind or snow.
Leave 1–2 inches of slack in the tubing near the tap to allow for temperature expansion. If the tubing freezes, the extra length prevents it from pulling the tap loose. I’ve seen taps pop out overnight when tubing was too tight—don’t make that mistake. Label each bucket with the tree’s ID and date for tracking sap yield.
⏰ Step 4: Monitor Sap Flow and Adjust Timing
Check taps daily at dawn when sap flows fastest. A healthy tap should yield 1–2 quarts per day during peak flow (late winter to early spring). If sap slows after 2–3 weeks, the tree’s reserves are depleted—remove the tap and let the tree recover. Never leave taps in past mid-March, or you’ll stress the tree.
Watch for dark sap or mold—this signals contamination. Clean the tap and tubing immediately with rubbing alcohol to prevent bacterial growth. If sap flow stops entirely, tap the tubing gently to dislodge air bubbles. Patience is key: some years, sap runs weakly; others, it gushes like a fountain.
Tips & tricks for perfect homemade maple tree taps
These practical insights will help you avoid common mistakes and maximize sap collection.
Tree Selection: Look for sugar maples with thick bark and healthy bark texture—these trees produce the most sap. I’ve found that trees with a diameter of at least 12 inches yield the best results, but avoid trees with signs of disease, like cankers or oozing sap. The bark should feel firm and smooth to the touch, not rough or cracked.
Drilling Technique: The slight upward angle when drilling holes is crucial—it prevents sap from pooling at the base. Use a pencil to mark your drilling spots before starting, and make sure your holes are perfectly aligned vertically. I’ve ruined several taps by drilling crooked holes, so take your time with this step. A clean, sharp spade bit will make the process smoother and reduce the risk of tearing the bark.
Sealing Strategy: When applying beeswax or paraffin wax to seal the tap, work quickly while the wax is still warm but not dripping. The goal is to create a smooth, even seal that prevents sap from leaking down the tree. I’ve found that using a paintbrush to apply the wax in thin layers works better than pouring it directly—it gives you more control and ensures full coverage around the tap edges.
Tubing Maintenance: The slack you leave in the tubing near the tap is essential for preventing damage during temperature changes. I recommend checking your setup every few days during cold snaps—if the tubing looks frozen, gently warm it with your hands or a hairdryer on low heat. Never use high heat, as this could melt the tubing or damage the tree. Regularly inspect for cracks or leaks in the tubing, especially where it connects to the tap and bucket.
Pro Tips for Homemade Maple Tree Taps
- These practical insights will help you avoid common mistakes and maximize sap collection.
- Tree Selection: Look for sugar maples with thick bark and healthy bark texture—these trees produce the most sap.
- Drilling Technique: The slight upward angle when drilling holes is crucial—it prevents sap from pooling at the base.
Frequently asked questions
Got questions about tapping maple trees? You’re not alone—this process can feel tricky at first! Here are answers to the most common queries to help you tap with confidence and avoid pitfalls.
When is the best time to tap maple trees?
The ideal window is late winter to early spring (before buds swell), when temperatures hover between 30–40°F at night and 40–50°F during the day. This consistency triggers sap flow. Missed the season? Wait until next year—tapping too early or late stresses the tree.
How long does sap flow last, and how much can I collect?
Sap flows for 2–6 weeks, depending on weather. A mature sugar maple yields 10–50 gallons per tap, while red or black maples produce less. Collect 1–2 gallons daily per tap to avoid overwhelming the tree. Use a food-grade bucket and check levels every 2–3 days.
What if my tap isn’t dripping sap? Troubleshooting tips.
- Check the drill hole: Ensure it’s 1.5–2 inches deep and angled slightly downward (sap flows best this way). Re-drill if clogged.
- Weather matters: Sap flows best with daytime highs above freezing. If temps are cold or warm, wait for ideal conditions.
- Tree health: Weak or young trees (under 10 inches in diameter) may not produce sap. Skip them to protect long-term growth.
- Clean the spile: Remove old sap crust or debris blocking the spout (the metal or plastic tap). A toothpick works in a pinch!
Can I tap non-maple trees (like birch or walnut) for syrup?
Technically yes, but maple syrup is the gold standard—other trees (birch, walnut, or hickory) produce sap with lower sugar content, requiring more processing for edible syrup. Birch sap is the closest alternative, but it’s less sweet and more watery. Stick with maples for the best flavor!
How often should I tap a single tree, and will it harm it?
Tap only once per tree (or twice max, spaced 1–2 years apart) to avoid stress. Follow these rules:
- Never tap trees under 10 inches in diameter.
- Use 1 tap per 10–20 inches of trunk diameter (e.g., a 20-inch tree gets 1 tap).
- Replace taps every 1–2 years to prevent disease.
Wrapping up and next steps
Tapping your own maple trees for sap is a rewarding way to connect with nature and enjoy the sweet fruits of your labor—literally! 🌳 With the right tools, timing, and technique, you can turn early spring into a delicious harvest of pure maple syrup.
Whether you're a seasoned sap collector or a first-timer, every drop of effort leads to golden, homemade goodness.
Ready to take the next step? Start small—try tapping just a few trees to perfect your method before scaling up. And don’t forget to share your syrup with friends or neighbors; nothing beats the joy of homemade treats! Happy tapping! 🍁