
Pruning
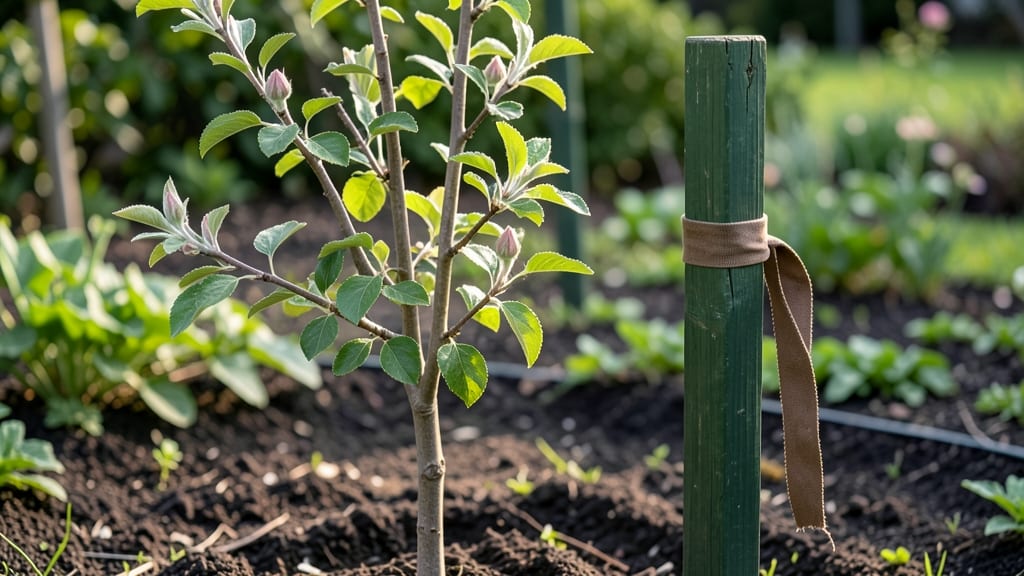
Staking a young tree feels like holding a baby bird's wings—too tight and you stunt its growth, too loose and it falls. The right technique keeps your tree steady without causing long-term damage, and I’ve learned the hard way what happens when you guess instead of follow the rules.
My first oak sapling nearly split its trunk because I tied the stakes too snugly, and now I know better: gentle support is the key to letting roots develop naturally.
The tools you need are simple: two sturdy wooden stakes (about 3 feet tall), soft tree ties or wide fabric strips, and a mallet. Avoid wire or anything that can cut into the bark—your goal is support, not a tourniquet.
Plant the stakes on opposite sides of the tree, about 6 inches from the trunk and angled slightly outward so they don’t compete for space as the tree grows. This setup gives your tree room to sway a little, which actually strengthens its trunk over time.
When you’re ready to tie, loop the fabric or tree tie in a loose figure-eight pattern around the trunk and stake, leaving room for your thumb to slide between the tie and the bark.
Check the fit every few weeks—you’ll know it’s too tight if the tree’s growth ring is visible under the tie. A properly staked tree should lean slightly into the wind but never feel restricted.
By next spring, you’ll see a straighter trunk and roots that’ve grown deep enough to stand on their own.
Most trees need staking for only the first year or two, but keep an eye on how they handle storms. If your tree is still wobbling after two seasons, it might need a little more time—or a stronger root system.
The secret is balance: enough support to survive, but not so much that the tree forgets how to grow strong. Once you master this, your young trees will thank you with decades of healthy growth.
📚 In This Guide
- What you need
- Instructions
- Tips and common mistakes
- Wrapping up and next steps
What you need
- ● Stakes: 2–4 wooden or metal tree stakes (1–2 inches in diameter, 4–6 feet tall). Avoid plastic—they can damage the tree as it grows.
- ● Tree Tie: Soft, stretchable tree tie or wide fabric strip (3–4 inches wide) to secure the tree without cutting into the bark.
- ○ T-posts or Rebar (Optional but Helpful): If your soil is loose, add 18-inch T-posts or rebar near the stakes for extra stability.
- ● Mulch: 2–3 inches of organic mulch (wood chips, straw) to protect the tree’s roots and retain moisture.
- ● Shovel or Spade: For digging small holes for stakes or adjusting the planting area if needed.
- ● Measuring Tape: To ensure stakes are placed at the correct angle (usually 30–45 degrees from vertical).
- ● Gloves: Protect your hands from splinters (wooden stakes) or sharp edges (metal stakes).
- ○ Pruners (Optional): If your tree has damaged branches that need trimming before staking.
- ● Choose a calm day—wind can make staking trickier and less effective.
- ● Ensure the tree is planted correctly (upright, not leaning) before staking.
- ● Check local guidelines—some areas discourage staking for certain tree species (like willows or fast-growing trees).
Step-by-Step instructions for staking a young tree
Here's how to support your tree's growth the right way—without overdoing it.
Choose the Right Stakes and Tie Material
Use 2-3 stakes per tree, depending on size. For a 4-foot tree, two 6-foot wooden stakes work well—drive them 6-12 inches from the trunk, angled slightly outward. Avoid metal stakes; they can damage roots over time. For ties, use soft tree tie material (not wire or twine)—it stretches slightly as the tree grows without cutting into the bark.
I like to position stakes opposite each other (like a compass direction) to distribute pressure evenly. If your tree is top-heavy, add a third stake on the side with the heaviest foliage. The goal is to mimic natural wind support, not create a rigid cage.
Install Stakes Properly for Stability
Drive stakes 6-8 inches deep into the soil, just outside the root flare (where the trunk widens at the base). The top of the stake should be 12-18 inches above the ground—this gives you room to adjust ties as the tree grows. Tap stakes firmly with a mallet, but don’t pound them so hard they damage nearby roots.
Here’s the trick: angle stakes outward slightly (about 10 degrees). This prevents them from pulling out when the tree sways. If the soil is rocky, use a hand auger to create pilot holes first—it saves your arms and keeps stakes plumb.
Attach the Tree Without Restricting Growth
Start with the first tie at the base, about 6 inches above the soil. Loop the tie around the trunk and stake, but leave 2-3 fingers of space between the trunk and stake—this prevents bark damage. For the second tie, place it 12-18 inches higher, then a third tie halfway up the stake if needed.
I adjust ties every 3-4 months as the tree grows. If the trunk rubs against the stake, loosen the tie immediately—friction can girdle the bark and stunt growth. Think of these ties as training wheels: they should guide, not strangle.
Monitor and Adjust Over Time
Check ties monthly for tightness. If the tree is growing faster than expected, add a spacer (like a small piece of rubber tubing) between the trunk and stake to prevent binding. By year 2, most trees no longer need staking—remove ties gradually to avoid sudden shock.
Watch for leaning or twisting—if the tree starts growing toward the stake, it’s getting too much support. In that case, loosen one side of the tie to encourage straight growth. The goal is independence, not dependency.
Tips & tricks for perfect tree staking
Here's what I've learned after staking dozens of trees—these simple adjustments make all the difference.
Stake Placement Precision: When positioning your 6-foot wooden stakes 6-12 inches from the trunk in Step 1, think about wind patterns. Place one stake on the side where prevailing winds hit hardest—this prevents leaning. I mark the spot with a small flag first to visualize how the tree will sway naturally. The outward 10-degree angle in Step 2 is crucial too; it mimics how trees naturally bend in storms without breaking.
Tie Tightness Test: In Step 3, when you're placing your first tie 6 inches above the soil, perform this quick check: slide your fingers between the trunk and stake. You should be able to fit 2-3 fingers comfortably—this prevents girdling while still providing support. I've ruined two trees by making ties too tight, so don't make my mistake: adjust until you can barely slide your fingers through.
Growth Monitoring Hack: The monthly tie checks in Step 4 reveal more than just tightness. Look for new growth rings or leaf patterns that show which direction the tree wants to grow naturally. If you notice consistent leaning toward one stake, that's your tree telling you it needs less support on that side. I keep a small notebook with photos of each tree's growth patterns—it's become my early warning system for potential issues.
Pro Tips for Stake A Young Tree
- Here's what I've learned after staking dozens of trees—these simple adjustments make all the difference.
- Stake Placement Precision: When positioning your 6-foot wooden stakes 6-12 inches from the trunk in Step 1, think about wind patterns.
- Tie Tightness Test: In Step 3, when you're placing your first tie 6 inches above the soil, perform this quick check: slide your fingers between the trunk and stake.
Frequently asked questions
Got questions about staking young trees? You’re not alone!
Here are answers to the most common concerns—so you can support your tree with confidence and avoid common pitfalls.
How tight should the stakes be when staking a young tree?
The stakes should be snug enough to stabilize the tree but loose enough to allow natural movement (about 1–2 inches of sway in wind). Over-tightening can girdle the trunk or restrict growth. Use a T-shaped spreader or rubber washers to prevent damage while keeping the tree secure.
How long should I leave stakes on a young tree?
Most trees only need stakes for 1–2 years—or until their root system is strong enough to stand alone. Check annually: if the tree sways but doesn’t topple, it’s time to remove the stakes. Over-staking weakens stems by preventing natural flexing, which builds strength.
What if my tree is leaning badly—can I still stake it?
Yes! Staking works best for moderate leans (up to 45 degrees). For severe leans, gently tie the tree to the stake with a soft, stretchy material (like tree tie fabric) and monitor weekly. Avoid forceful corrections—gradual adjustment is gentler on the trunk.
Are there alternatives to traditional stakes for young trees?
Try these options:
- Bamboo or willow stakes: Flexible and biodegradable.
- Tree guards or spiral wraps: Protect the trunk while allowing movement.
- No stakes at all: For small trees, a wide planting hole and mulch can encourage root spread naturally.
My tree’s trunk looks squished where the stake touches—what now?
This is called girdling, and it’s common if stakes are too tight or made of hard materials (like metal). Act fast:
- Loosen the ties immediately.
- Wrap the area with tree wound dressing or a soft cloth.
- Replace stakes with rubber-coated or fabric-wrapped options.
Wrapping up and next steps
Staking a young tree is all about giving it the support it needs while letting it grow strong on its own—no over-tightening required! 🌱 With the right materials, proper technique, and a little patience, you’ll help your tree stand tall and healthy for years to come.
Now that you’re ready to take action, pick a sunny day and get your hands dirty! Whether you’re a first-time gardener or a seasoned pro, every tree deserves the care to thrive. Happy planting! 🌳✨