
Container Gardens
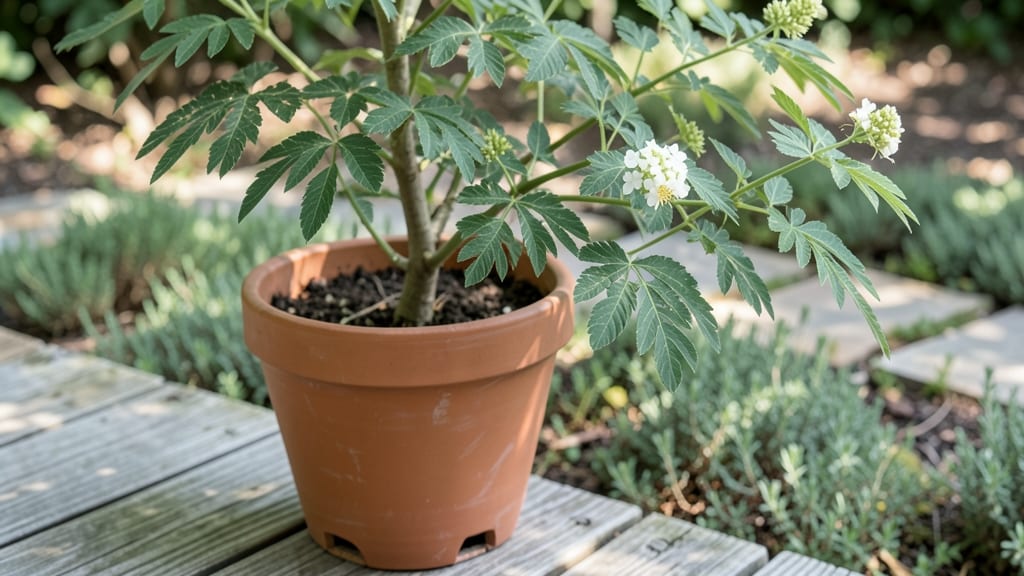
Growing a moringa tree in a pot is like having a superfood factory on your patio—it grows fast and keeps producing leaves for months, even in small spaces. 🌱 I’ve watched mine shoot up 12 inches in just 3 weeks with the right care, and the leaves taste like a mix of spinach and asparagus.
The key isn’t just sunlight or water—it’s matching the pot size to the plant’s hunger for roots and nutrients.
You’ll need a 5-gallon pot (minimum) with drainage holes, well-draining soil mixed with compost, and a spot that gets 6-8 hours of direct sun daily. Moringa hates soggy roots, so water only when the top inch of soil feels dry—overwatering is the #1 killer of potted moringa trees.
A balanced fertilizer every 4-6 weeks keeps it growing like a weed, and pruning the tips encourages bushier growth for more leaves.
By summer, you’ll be harvesting pounds of leaves—enough for smoothies, stir-fries, or dried powder. The tree stays compact (4-6 feet tall) and thrives in containers, making it perfect for balconies or urban gardens.
Just watch for yellowing leaves (too much water) or stunted growth (not enough sun), and you’ll have a year-round harvest that outperforms anything from the store.
Works in zones 9-11 year-round, but can be overwintered indoors near a sunny window. Start small, scale up, and soon you’ll be the neighborhood’s go-to for fresh moringa—no green thumb required, just patience and a little elbow grease.
📚 In This Guide
- What you need
- Instructions
- Tips and common mistakes
- Wrapping up and next steps
What you need
- ● Moringa seeds: 3–5 high-quality, organic seeds (ensure they’re fresh for best germination).
- ● Pot: Minimum 12-inch diameter (15+ inches for faster growth).
- ● Must have drainage holes (critical to prevent root rot!).
- ● Material: Terracotta (breathable) or fabric grow bags (prevents overwatering).
- ● Potting mix: 50/50 blend of cactus/succulent mix + well-draining organic soil (avoid heavy garden soil!).
- ● Gravel or perlite: 1–2 inches (for extra drainage at the pot’s bottom).
- ● Watering can or spray bottle: With a narrow spout for precise watering.
- ● Fertilizer: Balanced liquid fertilizer (10-10-10 or 20-20-20, diluted to half-strength).
- ● Organic options: Compost tea or worm castings (for a nutrient boost).
- ● Sunlight access: A south-facing window or grow light (6+ hours of direct sun daily).
- ● Humidity tray: To maintain moisture during germination.
- ● Trellis or small stake: For supporting taller moringa plants (once they reach 2–3 feet).
- ● pH test kit: To monitor soil pH (ideal range: 6.0–7.5).
- ● Pruning shears: For trimming leggy growth (sterilize with rubbing alcohol!).
- ● Mulch (e.g., coconut coir): To retain moisture and regulate temperature.
Step-by-step instructions for cultivating moringa in containers
Fast-growing moringa thrives in pots with the right care—here's how to coax rapid growth.
🌱 Step 1: Select the Right Pot and Drainage System
Moringa roots grow aggressively but hate soggy soil. Choose a 5-gallon container with multiple drainage holes—I use terracotta because it breathes and prevents root rot. Add a 2-inch layer of coarse gravel at the bottom to create an air pocket and improve drainage.
If your pot lacks drainage, drill holes yourself—moringa will outgrow poor drainage faster than you can water. The root system expands 3-4 inches per week under ideal conditions, so a 12-inch diameter pot gives young trees room to establish before transplanting.
🌿 Step 2: Prepare Fast-Draining, Nutrient-Rich Soil
Moringa demands well-aerated, slightly alkaline soil (pH 7.0-8.5). Mix 2 parts cactus/succulent mix with 1 part perlite and 1 part compost—this prevents compaction while providing nutrients. Avoid garden soil; it compacts and suffocates roots.
Sterilize your mix by baking it at 200°F for 30 minutes to kill pathogens. Moringa grows so quickly that weak seedlings often collapse from damping-off. Add 1 tablespoon of dolomitic lime per gallon of mix to adjust pH—you’ll see faster leaf production within 2 weeks of proper soil conditions.
☀️ Step 3: Plant and Position for Maximum Sunlight
Dig a hole twice as wide as the root ball but no deeper. Gently remove the seedling (if transplanting) and place it so the top of the root ball sits ½ inch below the pot rim. Fill gaps with your prepared mix and press lightly—moringa roots need firm contact but not compaction.
Moringa needs full sun (6+ hours daily)—place your pot where it gets morning sun and afternoon shade in hot climates. Without enough light, stems elongate and leaves pale. You’ll notice new leaves forming in 7-10 days if conditions are right. Rotate the pot quarter-turn weekly to prevent leaning.
💧 Step 4: Water Deeply and Maintain Consistent Moisture
Water deeply every 2-3 days until water runs freely from drainage holes. Moringa roots grow toward moisture, so shallow watering encourages shallow roots. Check moisture by sticking your finger 2 inches deep—if dry, water again. Overwatering causes root rot; underwatering causes leaf drop.
During rapid growth phases (spring/summer), increase watering to every 1-2 days. You’ll see new leaves unfurling daily—this is your cue to keep soil consistently moist but never soggy. Use room-temperature water to avoid shocking roots.
✂️ Step 5: Prune Strategically for Bushier Growth
Pinch back new growth tips when stems reach 6 inches to encourage branching. Moringa grows 3-5 feet in its first year if unpruned—pruning keeps it manageable and boosts leaf production. Use clean, sharp scissors to avoid tearing stems.
Harvest leaves by snipping outer leaves (never more than ⅓ of the plant at once). Regular pruning triggers bushier growth—within 4-6 weeks, you’ll see denser foliage and faster regrowth. Avoid heavy pruning in winter; moringa grows slower then and needs energy to recover.
Tips & tricks for fast moringa growth in containers
To maximize your moringa's explosive growth rate, these targeted strategies will help you avoid common pitfalls and accelerate those nutrient-packed harvests.
Soil Sterilization Secret: That 200°F sterilization step isn't just about killing pathogens—it also activates beneficial microbes in your cactus/succulent mix that moringa roots will thrive with. I like to add a handful of worm castings to the sterilized mix right before planting, which gives seedlings an immediate nutrient boost. The combination of sterilization and these castings creates the perfect environment for the rapid 3-4 inch weekly root expansion you're aiming for.
Light Positioning Hacks: For the full sun requirement, I've found that placing your pot on a rolling plant stand lets you adjust sunlight exposure throughout the day. Move it closer to the window during morning hours when light is strongest, then back slightly in the afternoon to prevent leaf scorch. This mimics natural sunlight patterns and prevents that leggy growth you get from uneven light exposure. The quarter-turn rotation you do weekly becomes even more important when using this method.
Watering Technique: The 2-inch moisture check might seem simple, but here's the trick: use your finger to press gently into the soil. If it springs back slowly (not immediately), that's your signal to water. I've found that using a moisture meter for the first few weeks helps train your touch—moringa roots are extremely sensitive to both over and under-watering, and this method gives you precise control over that critical moisture balance during the rapid growth phases.
Pruning Timing: When you pinch those growth tips at 6 inches, don't just cut—make it a clean pinch just above a leaf node. This encourages branching while maintaining the plant's energy flow. I've noticed that plants pruned this way show new leaf formation in just 7-10 days, which is exactly when you'd expect to see growth from proper sunlight exposure. The key is consistency: prune every 4-6 weeks to maintain that bushy shape while keeping harvests coming.
Pro Tips for Growing A Moringa Tree In A Pot
- To maximize your moringa's explosive growth rate, these targeted strategies will help you avoid common pitfalls and accelerate those nutrient-packed harvests.
- Soil Sterilization Secret: That 200°F sterilization step isn't just about killing pathogens—it also activates beneficial microbes in your cactus/succulent mix that moringa roots will thrive with.
- Light Positioning Hacks: For the full sun requirement, I've found that placing your pot on a rolling plant stand lets you adjust sunlight exposure throughout the day.
Frequently asked questions
Got questions about growing moringa in pots?
You’re not alone—this fast-growing superstar has a few quirks! Here are answers to the most common queries to help you cultivate a thriving Moringa oleifera at home.
How big of a pot do I need for a moringa tree?
A moringa tree thrives in 5-gallon pots or larger (at least 12–18 inches deep) to accommodate its deep root system. If you’re growing multiple trees, space them 12–18 inches apart in the same container. Use pots with drainage holes to prevent root rot—moringa hates soggy feet!
How fast does moringa grow in a pot?
Moringa is a speed demon! In ideal conditions (full sun, warm temps, and regular watering), you can expect 3–6 feet of growth per year. With proper care, you might harvest leaves in as little as 3–6 months from seed. Prune regularly to encourage bushier growth and more leaf production.
How often should I water a potted moringa tree?
Water your moringa when the top 1–2 inches of soil feel dry—typically every 2–3 days in hot weather and every 5–7 days in cooler months. Overwatering is the #1 killer, so ensure excess water drains away. Mulch the soil surface to retain moisture and reduce evaporation.
Can I grow moringa indoors year-round?
Yes! Moringa loves bright, indirect light (like a south-facing window or grow lights). Keep temps between 70–90°F and supplement with a grow light if natural light is limited. Just remember: indoor moringa may grow slower and produce fewer leaves than outdoor plants.
What pests should I watch for, and how do I treat them?
Moringa is generally pest-resistant, but keep an eye out for aphids, spider mites, or whiteflies. Treat infestations early with neem oil or insecticidal soap. Yellowing leaves or sticky residue? Wipe them down with a damp cloth and inspect the undersides of leaves.
Can I grow moringa from seed or cutting?
Both work! Seeds take 7–14 days to sprout (soak overnight for faster germination), while cuttings root in 2–4 weeks in water or moist soil. Cuttings (from healthy branches) often grow faster and retain the parent plant’s traits. Pro tip: Use rooting hormone to boost success rates!
Wrapping up and next steps
Growing a moringa tree in a pot is a rewarding journey that brings nutrient-rich greens right to your doorstep—no yard required! 🌱 With the right container, sunlight, and care, you’ll enjoy fast growth and continuous harvests in just a few months.
Start small, stay consistent, and watch your tiny seedling transform into a thriving, leafy powerhouse.
Ready to take the next step? Plant your seeds today and let nature do the rest—your future harvest (and healthier meals!) are just weeks away. Happy growing! 🌿