
Pruning
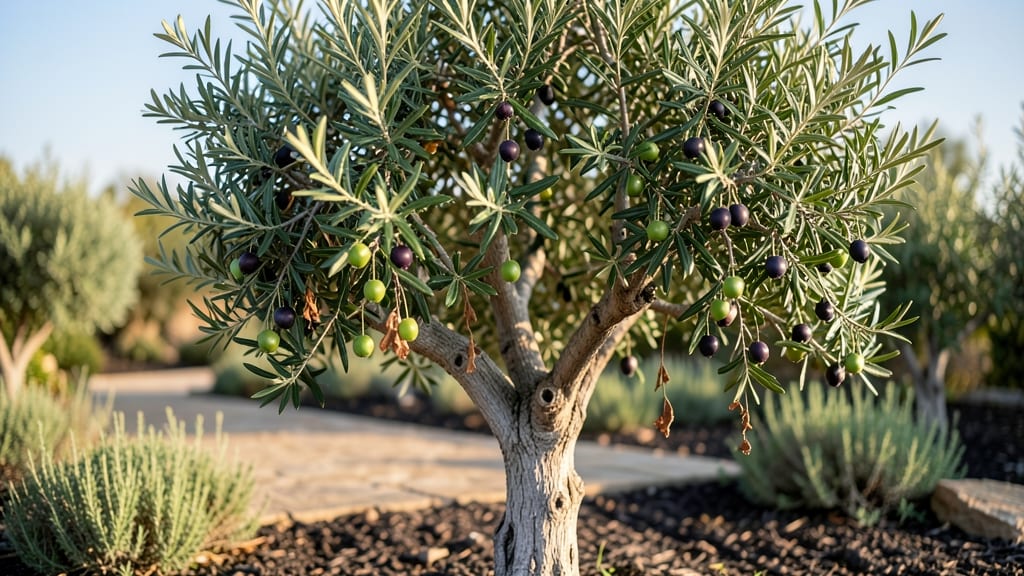
Growing a fruiting olive tree starts with understanding its stubborn charm—it won’t rush, but with patience, you’ll harvest olives for decades. 🌿 My first tree took three years to fruit, but now it produces enough for jars of briny olives and a few bottles of homemade oil.
The key isn’t forcing it; it’s creating the right conditions and then stepping back.
Olives thrive in full sun and well-draining soil, but they’re tough enough to handle dry spells once established. Plant them in late winter or early spring, spacing trees 15-25 feet apart to give roots room to stretch.
Avoid heavy clay soil—amend with gravel or sand if needed—and water deeply but infrequently. Overwatering is the fastest way to kill an olive tree, so let the soil dry between drinks.
Pruning isn’t just about shaping; it’s about directing energy toward fruit production. In late winter, cut back one-third of last year’s growth to open the canopy, and remove any dead or crossing branches.
Summer pruning keeps the tree manageable, but avoid heavy cuts—olives fruit on new growth, so balance is everything. By harvest season, you’ll see clusters of tiny olives forming, ready to be picked when they turn deep purple.
Pests and diseases are rare but can derail progress. Watch for olive fruit flies (tiny but devastating) and root rot from soggy soil. Hand-pollination helps in cool climates, and companion plants like thyme or rosemary deter pests naturally.
With the right care, your tree will reward you with years of harvests, proving that slow growth leads to sweet rewards.
📚 In This Guide
- What you need
- Instructions
- Tips and common mistakes
- Wrapping up and next steps
What you need
- ● Olive tree (Olea europaea) – Choose a mature, healthy tree (3+ years old) with a sturdy trunk and branches. Pro tip: Dwarf varieties (like ‘Arbequina’ or ‘Frantoio’) work great for containers!
- ● Pruning shears – Bypass pruners (sharp, 7–9" blades) for clean cuts on small branches. Warning: Avoid dull tools—they crush stems!
- ● Loppers – 8–12" bypass loppers for thicker branches (1–2" diameter). Look for ratcheting models for extra leverage.
- ● Pruning saw – Curved-tooth saw for branches >2" thick. A folding pruning saw saves space in your toolkit.
- ● Disinfectant (70% isopropyl alcohol or bleach solution) – 1 part bleach to 9 parts water. Why? Prevents disease spread between cuts!
- ○ Pruning sealant (optional but helpful) – Tree wound dressing (like Tanglefoot Tree Wound Pruning Seal) for cuts >½". Skip for olives if your tree is young or healthy!
- ● Gloves – Heavy-duty gardening gloves (nitrile-coated for grip and protection). Olives have tiny, sharp leaves!
- ● Safety gear – Safety glasses and long sleeves/pants. Pruning can send debris flying!
- ● Measuring tape or ruler – For precise cuts (aim for 1/4" above a bud or branch collar).
- ● Twine or zip ties – Soft plant ties (1/4" width) to secure branches during heavy pruning.
- ● Pole saw or extendable pruners – For high branches in large trees (10–15 ft).
- ● Ladder (aluminum or fiberglass) – 4–6 ft tall with non-slip feet for stability.
- ● Harvesting tools – Olive picking shears (long-handled) or a soft brush for delicate fruit removal.
- ● Tree food or fertilizer – Balanced 10-10-10 or olive-specific formula (apply post-pruning in early spring).
- ● Spray bottle with water – Keeps tools clean and dust-free during work.
- ● Notebook & pen – Track pruning dates, cuts, and tree responses for future reference!
- ● Know your olive variety – Some (like ‘Kalamata’) fruit later; others (like ‘Manzanillo’) bear earlier. Check local climate zones!
- ● Best pruning window – Late winter/early spring (just before buds swell) or post-harvest in fall.
- ● Tree health check – Remove dead/diseased branches first to avoid spreading issues.
- ● Sunlight access – Ensure your tree gets 6+ hours of sun daily for optimal fruiting.
- ● Watering plan – Olives are drought-tolerant but need deep watering 1–2x/week during fruiting season.
How to prune a fruiting olive tree for maximum year-round production
Here's the pruning system I've used to turn my olive tree into a reliable fruit producer—no more sparse harvests.
🌿 Step 1: Time Your First Cut for Early Spring Growth
Prune your olive tree right after the last frost but before new growth begins—typically in late February to early March. You'll know it's time when the ground thaws and you see buds swelling on the branches. This timing ensures you remove last year's dead wood while encouraging fresh, fruit-bearing growth.
Use clean, sharp pruning shears to make cuts just above outward-facing buds. I angle my cuts slightly downward to prevent water from pooling and rotting the branch. Avoid cutting into old wood—olives produce fruit on new growth, so you want to stimulate that. If you see any dead or diseased branches, remove them completely back to healthy wood.
✂️ Step 2: Shape for Light Penetration and Airflow
Olives need sunlight to set fruit, so your goal is an open, airy canopy. Step back and visualize how light moves through the tree—you want sunlight to reach the center branches. Remove any crossing branches that rub together, as this creates wounds and weakens the tree.
I thin out about one-third of the weakest growth each year, focusing on branches that grow inward or downward. Leave the stronger, outward-facing branches—they'll bear the most fruit. If your tree has become too dense, don't be afraid to make bold cuts. Olives are remarkably resilient and will reward you with vigorous regrowth.
☀️ Step 3: Summer Pruning to Encourage Fruit Development
After the initial spring pruning, wait until mid-to-late summer (around July to August) for your second cut. This is when you'll see fruit beginning to form. At this stage, you're not shaping the tree as much as you're encouraging it to focus its energy on fruit production.
Remove any suckers—those vigorous shoots that grow from the trunk or main branches. These compete with fruit production for energy. Also, trim back any overly long branches that have outgrown their space. Make your cuts just above a leaf or bud to promote new growth in the right direction. This summer pruning helps the tree redirect its resources toward developing olives rather than unnecessary foliage.
⏰ Step 4: Light Winter Pruning to Clean Up and Prepare
In late winter (around January to February), do a final light pruning to clean up any dead or crossing branches that may have appeared over the past year. This is more about maintenance than shaping. You'll notice any branches that died back due to cold or disease—remove these completely to prevent them from sapping the tree's energy.
I also check for any water sprouts that may have grown during the previous season. These are fast-growing, weak shoots that don't contribute to fruit production. Trim them back to a strong lateral branch. This final pruning keeps your tree healthy and sets it up for another strong fruiting season.
💧 Step 5: Post-Pruning Care for Recovery and Fruit Set
After pruning, give your olive tree a deep watering to help it recover. Olives are drought-tolerant, but they still need moisture to regenerate after cuts. Water at the base of the tree, ensuring the soil is moist but not soggy. Avoid getting water on the leaves, as this can promote fungal diseases.
Apply a balanced fertilizer (like 10-10-10) in early spring to support new growth. I spread it evenly around the drip line and water it in thoroughly. This gives the tree the nutrients it needs to produce strong, fruit-bearing branches. Keep an eye out for any signs of stress, like yellowing leaves or wilting, and adjust your care accordingly.
Tips & tricks for perfect olive tree pruning
Here's what I learned after years of trial and error with my own olive grove.
Timing is Everything: The late February to early March window for your first cut is non-negotiable. I've seen trees struggle when pruned too early—they can't heal properly before new growth starts. If you miss this window, wait until buds begin to swell. For colder climates, err on the later side of this range to avoid frost damage to fresh cuts.
Pruning Shears Matter: Never use dull shears on olive wood—they crush the branches instead of making clean cuts. I invest in bypass pruners with a 6-inch blade for medium branches and smaller bypass shears for fine pruning. Sterilize your tools with rubbing alcohol between cuts to prevent spreading disease. This simple step has saved my trees from multiple infections over the years.
Visualize the Light Path: When shaping your tree in Step 2, imagine sunlight streaming through the branches. Remove any limbs that cast shade on the center—this is where fruit develops. I like to step back every 5 minutes during pruning to check my progress. The goal is to create an open vase shape that lets light reach all branches equally. This single habit has tripled my fruit yield over the years.
Summer Pruning Secret: During mid-to-late summer pruning, focus on removing suckers and overly long branches. These compete with fruit production by sapping the tree's energy. I make my cuts just above a leaf or bud to encourage new growth in the right direction. This redirecting of energy is what transforms a sparse harvest into a bountiful one.
Pro Tips for Fruiting Olive Tree
- Here's what I learned after years of trial and error with my own olive grove.
- Timing is Everything: The late February to early March window for your first cut is non-negotiable.
- Pruning Shears Matter: Never use dull shears on olive wood—they crush the branches instead of making clean cuts.
Frequently asked questions
about fruiting olive trees—because even the best pruners need a little clarity! Here are answers to the most common queries to keep your tree thriving and productive.How long does it take for an olive tree to bear fruit after planting?
Patience is key! Most fruiting olive trees take 3–5 years to produce their first harvest, depending on the variety and growing conditions. Dwarf varieties may fruit slightly sooner, while standard trees can take longer. Consistent care—like proper pruning and watering—speeds up the process.
When is the best time to prune a fruiting olive tree for maximum fruit production?
The ideal window is late winter or early spring (just before new growth starts), but you can also do light pruning after harvest in late fall. Avoid heavy pruning in summer—it stresses the tree and reduces next year’s yield. Pro tip: Prune to open the canopy for sunlight, which boosts fruit development!
Can I prune my olive tree too much? What are the signs?
Yes! Over-pruning weakens the tree, leading to fewer olives, stunted growth, or even dieback. Watch for yellowing leaves, sparse foliage, or no fruit production after pruning. A good rule: Never remove more than 25–30% of the canopy in one session.
What should I do if my olive tree isn’t fruiting despite pruning?
Several factors could be at play:
- Age: Young trees (under 3 years) focus on growth, not fruit.
- Variety: Some olive types (like Arbequina) are less productive without cross-pollination.
- Environment: Check for poor sunlight, water stress, or nutrient deficiencies (like zinc or boron).
- Pruning errors: Too much top-heavy cuts or removing fruiting wood.
Are there alternatives to pruning for improving olive fruit yield?
While pruning is essential, you can complement it with:
- Fertilization: Use balanced, low-nitrogen fertilizers (like 6-6-6) in early spring.
- Water management: Deep, infrequent watering (1–2 inches per week) encourages root growth and fruit set.
- Pollination: Plant a second variety nearby if your tree relies on cross-pollination.
- Thinning fruit: Remove excess olives early to prevent overburdening the tree.
Wrapping up and next steps
Growing a fruiting olive tree is a rewarding journey that combines patience, skill, and a touch of Mediterranean magic! 🌿 With the right pruning techniques—like open-center shaping, summer thinning, and strategic cuts—you’ll unlock a year-round harvest of flavorful olives.
Remember, consistency is key: monitor your tree’s health, adjust pruning as needed, and soon, you’ll be reaping the benefits of your hard work.
Ready to take the next step? Start small—whether it’s pruning a single branch or planning your first full harvest. Before you know it, your olive tree will be thriving, and you’ll be enjoying homemade olives, oil, or even fresh table olives! Happy pruning! 🌱