
Pruning
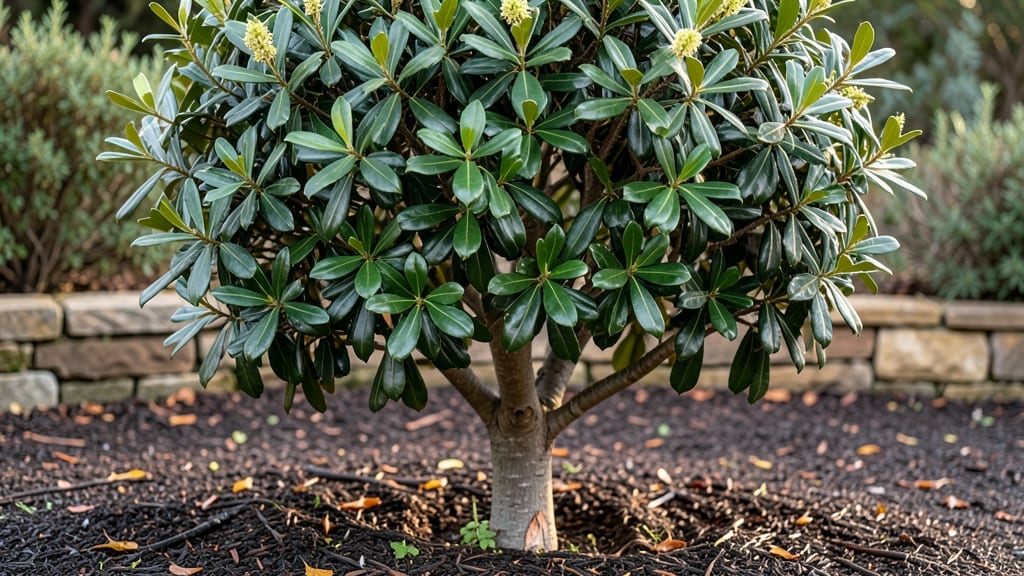
Caring for a bay leaf tree means unlocking that fragrant kitchen staple year-round—whether you grow it outdoors or indoors. 🌿 I've learned that these evergreen shrubs thrive with the right balance of sunlight, pruning, and patience, and the secret lies in understanding their natural growth patterns rather than forcing them into rigid shapes.
The key starts with 6+ hours of sunlight daily and well-draining soil that mimics their Mediterranean roots. Water deeply but let the top inch dry between sessions—overwatering is the fastest way to kill these tough plants.
Pruning isn't just about shaping; it's about encouraging dense, leafy growth by cutting back in late winter before new shoots emerge.
What you'll end up with is a lush, aromatic plant that produces leaves all year—perfect for cooking or decorative arrangements. The first harvestable leaves appear within 6-8 months of proper care, and with consistent pruning, your tree will stay compact and productive for decades.
Even indoors, they adapt beautifully with bright light.
For outdoor trees, winter protection in colder zones is crucial—just a thick mulch layer and a frost cloth during hard freezes keeps them thriving. Indoor growers should watch for spider mites, which love dry air, and mist leaves regularly.
The real magic happens when you treat pruning like a conversation with the plant, not a chore.
📚 In This Guide
- What you need
- Instructions
- Tips and common mistakes
- Wrapping up and next steps
What you need
- ● Pruning shears: Bypass pruners (sharp, 6–8" blades) for clean cuts on small branches.
- ● Loppers: 10–14" for thicker branches (up to 2" diameter).
- ● Pruning saw: A fine-toothed, curved blade for larger limbs (2"+ diameter).
- ● Gloves: Heavy-duty, cut-resistant gloves (gardening or pruning-specific).
- ● Disinfectant: 70% isopropyl alcohol or a pruning sealant (to prevent disease spread).
- ● Rake or broom: For clearing debris after pruning.
- ○ Twine or zip ties: To secure branches during training (optional for young trees).
- ● Hand pruners with a bypass blade: For precision trimming on delicate shoots.
- ● Extension pole: For reaching higher branches safely.
- ● Tree wound dressing: (Controversial but useful for large cuts—use sparingly!)
- ● Notebook & pen: To track pruning dates and growth patterns.
- ● Watering can or hose: For post-pruning hydration (especially in dry climates).
- ● Knowledge of bay leaf tree anatomy: Identify main stems, lateral branches, and leaf clusters.
- ● Weather check: Prune on a dry, overcast day (avoid wet or windy conditions).
- ● Safety gear: Long sleeves, closed-toe shoes, and eye protection if working near large branches.
- ● Patience: Bay trees respond best to gradual pruning—don’t rush the process!
Step-by-step pruning guide for a healthy bay leaf tree
Master the art of shaping and maintaining your bay leaf tree with these proven techniques.
✂️ Step 1: Time Your Pruning for Optimal Growth
Prune your bay leaf tree in late winter or early spring, just as new growth begins. This timing aligns with the tree's natural dormancy break and ensures you don't interfere with its energy reserves. Avoid pruning in fall or winter when the tree is less active, as this can leave it vulnerable to disease or frost damage.
Look for dormant buds along the branches—they'll appear as small, plump swellings. These are your cues to make cuts just above them, which encourages new growth in the right direction. I always prune on a dry, sunny morning when the air is still crisp—this helps wounds heal faster and reduces the risk of fungal infections.
🌿 Step 2: Remove Dead, Diseased, or Crossed Branches First
Start by identifying branches that are dead, diseased, or rubbing against others. These are your top priorities—they compete with healthy growth and can spread problems. Use sharp, clean pruning shears to make cuts at a 45-degree angle, about ¼ inch above a bud or lateral branch. This angle helps water run off the cut, preventing rot.
If a branch is larger than ½ inch in diameter, use a pruning saw for a clean cut. Never leave stubs—these invite decay and weaken the tree's structure. I always disinfect my tools with rubbing alcohol between cuts to prevent spreading any hidden pathogens lurking in the bark.
✂️ Step 3: Shape the Tree for Airflow and Light Penetration
Bay leaf trees thrive when they receive at least 6 hours of sunlight daily, so prune to open up the canopy. Remove any branches growing inward or downward—they create dense shade that encourages fungal growth and weakens the tree's structure. Aim to create an open, vase-like shape that allows light to reach the lower branches.
Focus on thinning rather than just cutting back. Instead of removing entire branches, target specific areas where growth is too dense. You'll know you're doing it right when you can see light filtering through the canopy and air circulating freely. This also makes harvesting leaves easier—no more reaching into a tangled mess!
⏰ Step 4: Encourage New Growth with Strategic Cuts
After removing problem branches, turn your attention to shaping the tree's overall form. Cut back overly long or leggy branches by about ⅓ of their length to encourage bushier growth. Make your cuts just above a healthy outward-facing bud to direct energy where you want it.
Watch for water sprouts—those fast-growing, vertical shoots that pop up in odd places. These are energy vampires, so snip them off at the base. You'll see new, stronger shoots emerge within 4-6 weeks as the tree redirects its resources. This is the moment that matters: your tree is telling you it's ready to grow thicker and fuller.
🌱 Step 5: Finish with a Cleanup and Post-Pruning Care
Once you've made all your cuts, gather up the debris and remove it from the area. Leaving pruned branches on the ground can harbor pests or diseases that might reinfect your tree. I always compost the healthy-looking clippings—they make great mulch for other plants in the garden.
After pruning, give your bay leaf tree a deep watering to help it recover. Avoid fertilizing immediately, as new growth needs time to establish itself. Keep an eye on the tree over the next few weeks—you should see fresh, vibrant leaves emerging from the buds you left behind. If you notice any yellowing or wilting, it's a sign the tree is struggling, and you may need to adjust your care routine.
Tips & tricks for perfect bay leaf tree pruning
These science-backed strategies will transform your pruning from guesswork to garden artistry.
Timing is Everything: The late winter to early spring window isn't just about avoiding frost—it's about catching the tree's natural growth surge. I've seen trees pruned in summer struggle with stunted regrowth because they're already stressed from heat. Watch for those dormant buds swelling slightly—they're nature's countdown timer telling you it's time to prune. This precise timing ensures your cuts will produce the most vigorous new growth within weeks.
Tool Mastery: Your pruning shears and saw are more important than you might think. I learned this the hard way after using dull tools that crushed branches instead of making clean cuts. Always use sharp tools to prevent tearing bark, which creates entry points for diseases. That 45-degree angle isn't just aesthetic—it's hydraulic engineering. The slope directs water away from the cut, preventing rot that could kill your tree from the inside out.
Light Penetration Strategy: When shaping your tree in Step 3, think of sunlight as your tree's lifeblood. The goal is to create a canopy where every leaf gets its fair share—no more dark, shaded interior branches that become fungal breeding grounds. I like to visualize the tree as a glass sculpture: if you can see light filtering through when you look at it from different angles, you've succeeded. This open structure also makes harvesting leaves a breeze later, as you won't be fighting tangled branches.
Post-Pruning Recovery: That deep watering after pruning isn't just a formality—it's your tree's first drink after major surgery. The roots need to replenish the moisture lost through all those new cut surfaces. I've noticed trees recover fastest when pruned on warm, sunny days (but not too hot) because the warmth helps the tree metabolize sugars for healing. Avoid fertilizing immediately, as new growth needs to establish its own root system first—think of it as a healing period before adding extra nutrients.
Pro Tips for Bay Leaf Tree Care
- These science-backed strategies will transform your pruning from guesswork to garden artistry.
- Timing is Everything: The late winter to early spring window isn't just about avoiding frost—it's about catching the tree's natural growth surge.
- Tool Mastery: Your pruning shears and saw are more important than you might think.
Frequently asked questions
Got questions about keeping your bay leaf tree happy and healthy? You’re not alone! Here are some of the most common concerns—and straightforward answers—to help you master bay leaf tree care with confidence.
When is the best time to prune my bay leaf tree?
Prune your bay leaf tree in late winter or early spring (just before new growth begins). This timing promotes vigorous growth while avoiding harsh winter damage. Avoid heavy pruning in fall, as it can stress the tree before dormancy. Light trimming to shape or remove dead branches can happen year-round, but stick to major cuts during the ideal window.
How do I know if I’m pruning too much or too little?
Bay leaf trees are resilient, but prune no more than 25-30% of the foliage at once to avoid shock. Signs of over-pruning include yellowing leaves, stunted growth, or excessive leaf drop. If you’ve cut back too aggressively, reduce watering temporarily and fertilize lightly to support recovery. For minimal pruning, focus on removing dead, diseased, or crossing branches to maintain airflow.
Can I grow a bay leaf tree indoors? What’s the catch?
Yes! Bay leaf trees thrive indoors with bright, indirect light (south or west-facing windows work best). The catch? They need consistent humidity—mist leaves regularly or use a pebble tray. Avoid drafts, and prune lightly to control size. If leaves yellow or drop, it’s often a sign of low light or overwatering. A dwarf variety (like Laurus nobilis ‘Angustifolia’) is ideal for containers.
Why are my bay leaves turning brown or curling? How do I fix it?
Brown or curling leaves usually signal pests, disease, or environmental stress. Check for spider mites, scale, or aphids on the undersides of leaves—treat with neem oil or insecticidal soap if found. Overwatering or underwatering can also cause browning; ensure soil is moist but well-draining. If leaves curl upward, it may be excessive heat or drought stress—move the plant to a cooler spot and water deeply.
Can I propagate bay leaves from cuttings? How do I do it?
Take 4-6 inch cuttings from healthy, non-flowering branches in spring or summer. Remove lower leaves, dip the cut end in rooting hormone (optional), and plant in moist perlite or sand. Keep the cutting warm (70–75°F) and humid (use a plastic bag or propagator). Roots typically form in 4–8 weeks. Once rooted, transplant to soil and care for it like a mature tree.
Pro Tip:
Need a quick bay leaf tree care cheat sheet? Bookmark this: Water when topsoil is dry, prune in late winter, and fertilize lightly in spring. Consistency beats intensity—your tree will reward you with lush, aromatic foliage year-round!
Wrapping up and next steps
Caring for your bay leaf tree is all about patience, precision, and a little love—and with the right pruning techniques, you’ll enjoy lush, fragrant foliage year after year! 🌿 By mastering the art of shaping, disease prevention, and seasonal adjustments, you’re not just trimming branches—you’re nurturing a thriving plant that rewards you with beauty and utility.
Ready to take the next step? Grab your pruners, review your notes, and schedule your next pruning session—your bay leaf tree will thank you with vibrant growth! 🌟